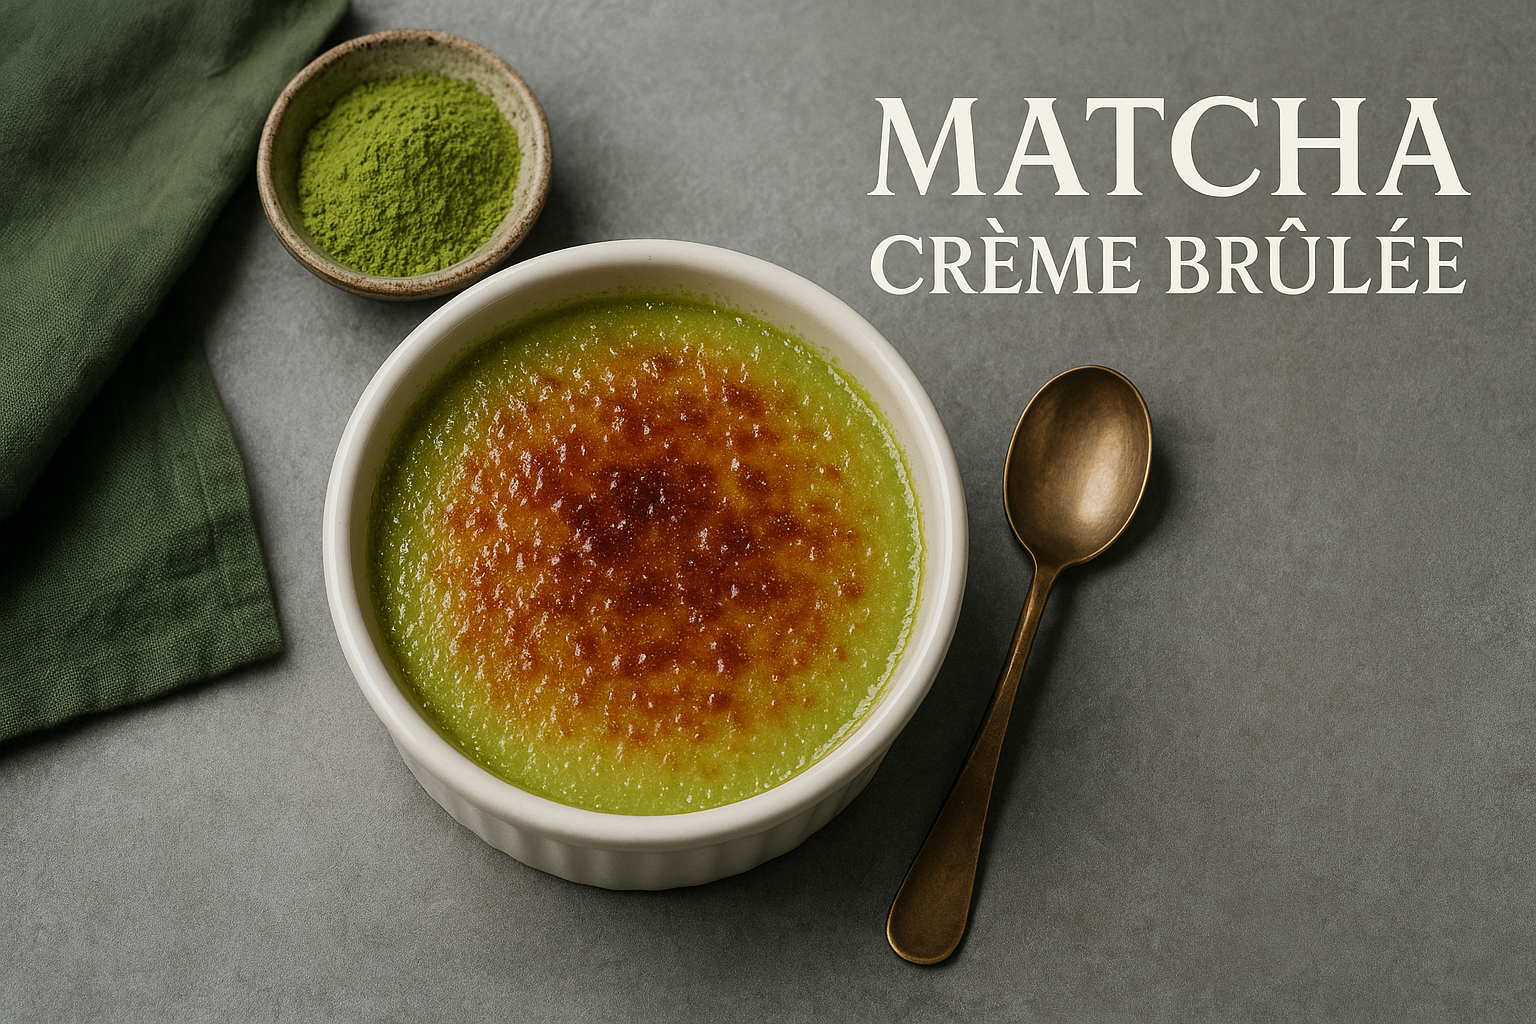
What is Decaf Matcha Crème Brûlée?
Crème brûlée is a classic French dessert. It is famous for its rich custard base. It is also known for its contrasting layer of hard, caramelized sugar on top. The name itself means “burnt cream” in French. People love the satisfying moment of cracking the glassy sugar crust with a spoon. This reveals the smooth, creamy custard beneath. It is a dessert that feels both elegant and comforting.
This recipe introduces a unique twist to the traditional version. We will infuse the custard with decaf matcha. Matcha is a finely ground powder of specially grown and processed green tea leaves. It brings a beautiful green color and a complex flavor. The taste is slightly bitter, a little sweet, and has deep, earthy notes. This unique flavor profile beautifully cuts through the richness of the cream and egg yolks. It creates a dessert that is perfectly balanced and not overly sweet.
Using decaf matcha powder is a key element. It allows you to enjoy this sophisticated treat at any time of day. You can savor it as an after-dinner dessert without worrying about caffeine affecting your sleep. It makes the dessert accessible to everyone, including those who are sensitive to caffeine. This Decaf Matcha Crème Brûlée is a wonderful fusion of Japanese flavors and French pastry techniques. It is a truly special dessert that is sure to impress.
Ingredients (Yields 6 servings)
- Heavy Cream: 2 cups (480ml)
- Large Egg Yolks: 6
- Granulated Sugar: ½ cup (100g), for the custard
- Granulated Sugar: approx. ¼ cup (50g), for the topping
- High-Quality Decaf Matcha Powder: 2 teaspoons (4g)
- Pure Vanilla Extract: 1 teaspoon
- Salt: 1 pinch
Instructions
- Prepare Oven and Ramekins: Preheat your oven to 325°F (160°C). Arrange 6 four-ounce ramekins in a deep baking dish.
- Heat the Cream: In a medium saucepan, gently heat the heavy cream over medium heat until it is hot and steaming. Do not let it boil. Remove from the heat.
- Mix Yolks and Matcha: In a large bowl, whisk the egg yolks and ½ cup of sugar together until pale and slightly thickened. Sift the decaf matcha powder into the mixture and whisk until smooth and uniform in color.
- Temper the Eggs: While whisking constantly, very slowly stream a small amount of the hot cream into the egg yolk mixture. Continue adding the cream in small additions until about half has been incorporated, then slowly whisk in the rest.
- Strain the Custard: Stir in the vanilla extract and salt. Pour the entire custard mixture through a fine-mesh sieve into another clean bowl or large measuring cup to ensure it is perfectly smooth.
- Prepare the Water Bath: Divide the strained custard evenly among the prepared ramekins. Place the baking dish in the preheated oven. Carefully pour boiling water into the dish until it reaches halfway up the sides of the ramekins.
- Bake: Bake for 30-40 minutes. The custards are done when the edges are set but the centers still have a slight jiggle.
- Cool and Chill: Carefully remove the dish from the oven. Let the ramekins cool in the water bath for a few minutes, then transfer them to a wire rack to cool completely to room temperature. Cover each ramekin and refrigerate for at least 4 hours, or preferably overnight.
- Caramelize and Serve: Just before serving, sprinkle a thin, even layer of sugar over each chilled custard. Use a kitchen torch to melt the sugar until it forms a deep amber, glassy crust. Let it harden for a minute, then serve immediately.
Required Kitchen Tools
You do not need many professional tools to make a beautiful crème brûlée at home. However, a few specific items will make the process much smoother. The most important items are the baking dishes. You will need several shallow, ceramic dishes called ramekins. Ramekins (small, oven-safe bowls) are ideal because they allow the custard to cook evenly. Shallow ramekins are better than deep ones for this dessert. They create a larger surface area for the caramelized sugar crust.
You will also need a larger baking pan or dish. This dish must be deep enough to hold the ramekins without them touching. It will be used to create a water bath. A water bath, also known as a bain-marie (a pan of hot water used for gentle cooking), is essential. It protects the custard from the direct, harsh heat of the oven. This gentle cooking method is the secret to a perfectly smooth, non-curdled texture. For mixing, a simple whisk and a couple of mixing bowls will be necessary.
To heat the cream, a medium-sized saucepan is required. You will also need a fine-mesh sieve or strainer. Straining the custard mixture before baking is a critical step. It removes any small bits of cooked egg or undissolved matcha, guaranteeing a silky-smooth final product. Lastly, you will need a tool to caramelize the sugar. The best tool for this job is a small kitchen torch. A torch gives you precise control over the melting and browning of the sugar. If you do not have a torch, you can use your oven’s broiler function as an alternative. It requires careful watching but can also produce a great result.
Detailed Step-by-Step Guide
Step 1: Preparing the Matcha Custard Base
The first step in creating your delicious dessert is preparing the custard base. Begin by getting your oven ready. You should preheat it to 325 degrees Fahrenheit, which is 160 degrees Celsius. Placing the oven rack in the middle position ensures even cooking. While the oven heats up, you can start on the custard mixture. Take out your medium-sized saucepan and pour the heavy cream into it. Place the saucepan over medium heat on your stovetop.
You want to gently heat the cream until it is hot and steaming. Small bubbles may start to form around the edges of the pan. It is very important that you do not let the cream come to a full boil. Boiling the cream can cause it to separate or form a skin. Heating it gently infuses the flavors more delicately. Keep a close eye on it during this stage. Once it is sufficiently heated, remove the saucepan from the heat and set it aside for a moment.
Now, take a separate mixing bowl. In this bowl, combine the egg yolks and the first portion of granulated sugar. Use a whisk to mix them together vigorously. Continue whisking for a couple of minutes. You will notice the mixture start to change. It will become lighter in color, turning from a bright yellow to a pale, creamy shade. The texture will also become thicker. This process is important for creating a smooth foundation for your custard. Next, you will sift the decaf matcha powder directly into the egg yolk and sugar mixture. Sifting prevents clumps and ensures the matcha powder dissolves evenly. Whisk everything together until the matcha is fully incorporated and the mixture is a uniform, beautiful green color.
Step 2: Tempering the Eggs and Cream
This next step is perhaps the most crucial for achieving a perfect, silky custard. It is called tempering. Tempering (slowly adding a hot liquid to eggs to prevent scrambling them) is a technique that gently raises the temperature of the eggs. If you were to add the hot cream to the egg yolks all at once, the heat would cook the eggs instantly. This would result in a lumpy, scrambled mess instead of a smooth custard. We must avoid this at all costs.
To begin the tempering process, make sure your warm cream is nearby. Also, have your whisk ready. Start by taking a small amount of the warm cream. A ladle or a small measuring cup works well for this. Slowly pour just a little bit of the hot cream into the egg yolk and matcha mixture. As you pour with one hand, you must continuously and briskly whisk the mixture with your other hand. This constant motion is key. It disperses the heat from the cream quickly and evenly, preventing any part of the eggs from cooking.
After you have successfully mixed in the first bit of cream, repeat the process. Add another small ladle of warm cream, again while whisking constantly. Continue this process, adding the cream bit by bit. You will feel the egg mixture gradually warming up. Once you have added about half of the hot cream to the egg mixture, it is safe to combine the two more quickly. You can now slowly pour the remaining cream from the saucepan into the bowl, still whisking as you go. Once all the cream is incorporated, add the vanilla extract and the pinch of salt. Give it one final whisk to combine everything. Your custard base is now ready.
Step 3: Baking the Custards in a Water Bath
Now that your custard base is prepared, it is time to bake it. The method we use, a water bath, is essential for the delicate texture of crème brûlée. First, pass your prepared green custard mixture through a fine-mesh sieve. Pour it from the mixing bowl through the sieve into another clean bowl or a large measuring cup with a spout. This step is non-negotiable for a truly professional result. It catches any tiny lumps of matcha or any small bits of egg that might have accidentally cooked, ensuring the final product is perfectly smooth.
Next, arrange your empty ramekins inside the larger, deep baking dish. Make sure they sit flat and are not too crowded. Carefully pour the strained custard mixture into each ramekin. Try to fill each one with an equal amount so they all cook at the same rate. A measuring cup with a spout makes this pouring process clean and easy. After filling the ramekins, you will create the water bath. Boil some water in a kettle or on the stove. Carefully pour the hot water into the large baking dish, around the ramekins. Be very careful not to splash any water into the custard itself.
You should fill the dish with enough hot water to come about halfway up the sides of the ramekins. This water will insulate the custard from the direct heat of the oven. It creates a steamy, humid environment that allows the custard to cook gently and evenly. This prevents the edges from overcooking before the center is set. It also helps prevent cracks from forming on the surface. Carefully place the entire setup, the baking dish with the ramekins and water, into your preheated oven. Bake for about 30 to 40 minutes. The exact time can vary depending on your oven and the size of your ramekins. You will know they are done when the edges are set, but the center still has a slight wobble or jiggle when you gently shake the pan. Do not overbake them.
Step 4: Chilling for the Perfect Set
Baking is complete, but the crème brûlée is not yet ready. The chilling process is just as important as the baking. This stage allows the custard to fully set and for the flavors to meld and deepen. It is a step that requires patience, but it is well worth the wait. Once you have determined the custards are perfectly baked, with that slight jiggle in the middle, carefully remove the baking dish from the oven. Remember that the dish and the water inside are extremely hot.
Let the ramekins remain in the hot water bath for a few minutes on a cooling rack. This allows them to begin the cooling process gently. Then, very carefully, lift each ramekin out of the water bath. You can use tongs or a spatula for this. Place the individual ramekins on the cooling rack. Let them cool down to room temperature. This can take about an hour. You should not place hot ramekins directly into the refrigerator. A drastic temperature change can cause condensation to form on the custard’s surface.
Once the custards have cooled to room temperature, it is time to move them to the refrigerator. Cover each ramekin loosely with plastic wrap. This prevents the custard from absorbing any other smells from your fridge. It also stops a skin from forming on the surface. Place the covered ramekins in the refrigerator to chill. They need to chill for a minimum of four hours. However, for the best possible texture and flavor, it is highly recommended to let them chill overnight. This extended chilling time ensures the custard is firm, dense, and perfectly set all the way through.
Step 5: Creating the Signature Burnt Sugar Crust
This final step is the most exciting part. It is what transforms the chilled custard into a true crème brûlée. This part should always be done just before you plan to serve the dessert. The crunchy, warm caramel crust provides a wonderful contrast to the cool, creamy custard beneath. If you do this step too early, the sugar will absorb moisture from the custard and the air, losing its signature crispness and becoming soft.
Take your fully chilled custards out of the refrigerator. Remove the plastic wrap. Dab the surface of each custard gently with a paper towel. This will remove any condensation that may have formed. A dry surface is essential for a crisp caramel crust. Now, sprinkle an even layer of granulated sugar on top of each custard. You want a thin, uniform layer that completely covers the surface. Too much sugar will result in a thick, overly bitter crust, while too little will not create a satisfying crack.
Now it is time to caramelize the sugar. The best way to do this is with a kitchen torch. Hold the torch a few inches away from the sugar and move the flame back and forth continuously. You will see the sugar start to bubble, melt, and then turn a beautiful deep amber color. Keep the torch moving to avoid burning any one spot. If you do not own a torch, you can use your oven’s broiler. Place the ramekins on a baking sheet and set them on the highest rack in your oven. Turn the broiler on high and watch them very closely. It will only take a minute or two. The sugar will melt and brown quickly. As soon as the sugar is caramelized, remove them from the oven. Let the finished crème brûlée sit for a minute or two for the melted sugar to harden into a glassy crust before serving.
Expert Tips for Restaurant-Quality Results
To elevate your homemade decaf matcha crème brûlée from good to great, here are a few expert tips. First, always prioritize the quality of your matcha. The flavor of the entire dessert depends on it. A high-quality, fresh matcha powder will provide a vibrant color and a smooth, nuanced flavor without being overly bitter. It truly makes a difference.
Second, be very careful not to overbake the custard. This is the most common mistake. An overbaked crème brûlée will have a grainy or curdled texture instead of a silky one. Remember to look for the signature jiggle in the center. The residual heat will continue to cook the custard even after you remove it from the oven, so pulling it out at the right moment is key.
Third, do not skip the step of straining the custard mixture. It may seem like a small detail, but it is the secret to an incredibly smooth texture. This simple action removes any potential lumps and ensures a flawless, velvety consistency in every spoonful. Similarly, ensuring the sugar layer for the crust is thin and even is very important. An even layer melts uniformly, creating that perfect, glass-like sheet of caramel. A thick or uneven layer can easily burn in some spots while remaining grainy in others.
Finally, the timing of serving is critical. The magic of crème brûlée is the contrast between the warm, crackly topping and the cool, creamy custard. Serve it immediately after caramelizing the sugar. This ensures your guests experience that perfect texture and temperature difference. The crunch of the caramel is fleeting, so enjoy it right away.
Storing and Serving Your Crème Brûlée
Proper storage is important if you want to prepare parts of this dessert in advance. The baked and chilled custards, before the sugar topping is added, can be stored in the refrigerator. After they have cooled completely, cover them with plastic wrap. They will keep well for up to three days. This makes them a fantastic make-ahead dessert for dinner parties or special occasions. You can do all the prep work ahead of time and simply caramelize the tops just before serving.
It is important to note that you should not try to store the crème brûlée after the sugar crust has been created. The moisture from the custard will quickly dissolve the hardened caramel, turning your crunchy topping into a soft, syrupy layer. The textural contrast will be lost. Therefore, only torch the number of crème brûlées that you plan to serve immediately.
Freezing the finished dessert is also not recommended. The freezing and thawing process can drastically change the texture of the custard, making it watery and grainy. When it comes to serving, the dessert is stunning on its own. The vibrant green of the matcha custard against the dark amber of the caramel crust is visually appealing. You can serve it simply in its ramekin. For a little extra decoration, you can add a few fresh berries, like raspberries or blueberries, on the side. A small mint leaf can also add a nice touch of color and freshness. Enjoy the delightful experience of making and eating this elegant dessert.